Resuming a Flight
Did your simulator crash during your last flight? Or maybe you were interrupted for other reasons and needed to exit from the sim? Or the FSC plugin/client interrupted your flight because it detected some rule violation?
As a premium user you can resume this interrupted flight! FSCharter knows your last position. The challenge is to get back there. The point where you left off is called Resume Point.
There are many ways to resume. The feature is powerful and flexible. The basic principles, however, are always the same:
The Flight Continues when...
...you cross the Resume Point in the right direction with the right speed at the right altitude. Don't worry, tolerances apply.
Flight Continuation is Server-Based
Don't worry about your local apps' status when you want to resume a flight. All necessary details are stored on and retrieved from the FSC server. You could reboot your PC. Or you could even start a flight in X-Plane on one computer and finish it in MSFS on another computer.
Max 6 Hours
The FSC platform cancels a job automatically that had no updates for 6 hours (so that the plane becomes available againto other users).
Not for Invalidated flights
Invalidated flights are already cancelled by the server, they cannot be resumed. Interrupted flights can.
Standard Way to Resume#
This describes the standard way of resuming an airborne flight. The (restarted) simulator, however, will place you on the ground at the beinning.
This way may not be the fastest way depending on your situation, but the way to take if you don't want to be offered many questions and options. You only need to take off, turn into the right direction and accelerate to the right speed. Then the FSC client teleports you to the right location and altitude.
Video: How-to resume a flight using Teleport with MSFS
See this Youtube video about how to resume an FSCharter flight in MS Flight Simulator after the simulator crashed.
- If required, restart you simulator.
- Load your simulator with the same plane to an airport somewhere more or less close to where the flight was interrupted. You can place the plane directly on the runway.
- Optional: If the FSC client still shows an
Start Overbutton under the last message, click it for the client to reload flight information. - The FSC client greets you with "You have an active flight". Click the
Prepare for Flight Continuationbutton, which will set fuel and payload automatically if configured, the same way as during boarding, but will not move you anywhere yet. If you configured FSC not to set fuel/payload automatically, then you have to do so manually now. - Next, click the
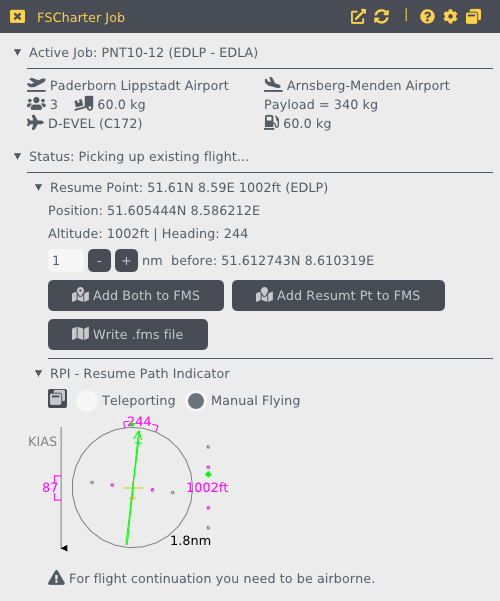
Teleport or Fly to Resume Pointbutton. - An artifical instrument appears, the Resume Path Indicator (RPI).
- Size the Job window so that the entire RPI including the text underneath is shown. Or pop it out into a separate screen by clicking the Windows button (left of the Teleport option).
- Above the RPI, ensure Teleport is selected.
- Under the RPI, ensure the Auto Teleport option is activated.
- Take off and fly your plane to correct speed and heading:
- Turn to the correct heading, so that the target heading appears on top of the RPI and the top rectange turns green.
- Accelerate to the target speed so that the triangle on the left speed bar of the RPI turns green.
- When both heading and speed matches, keep you plane straight and levelled.
- The text unter the RPI gives hints which aspects need correction.
- As soon as all conditions are met the FSC client teleports your plane to the Resume Point, ie. right location and altitude. You flight resumes momentarily.
Fuel Handling#
Reaching the Resume Point burns fuel, but don't worry, that fuel doesn't count against your consumed fuel on FSCharter. If fuel is handled automatically (default, see plane-specific options), then the plugin/client will even update the aircraft's fuel level at the Resume Point to match the fuel you had when interrupted.
Update Fuel Manually after Resume
If you configured the plugin/client to handle fuel manually, then you can also compensate manually for the fuel needed to reach the Resume Point and increase you plane's current fuel level mid-flight, as long as you don't load (much) more than the Expected fuel level displayed in the Job window.
Other Typical Scenarios#
You may be able to resume even faster in some situations:
If your flight got interrupted by the FSC client quoting a violation of rules,
- pause the flight mid-air (X-Plane: [P], MSFS: [Esc]),
- click the
Start Overbutton for the client to reload flight information, - then just continue with In-Air Resume. That process takes already care of fuel, payload, position, which are the typical causes of interruption. You could manage to resume the flight within just a few seconds after interruption.
If you have a saved situation file,
- load that situation after simulator restart, so that you are right away back in the air with a fully configured plane.
- Some 3rd party vendor planes even regularly save situation files to be able to resume quickly after a crash and load into it upon restart.
- Once in the air pause the simulator (X-Plane: [P], MSFS: [Esc]).
- Continue with In-Air Resume.
If your flight was interrupted on the ground,
- then the steps are pretty much the same as for the Standard way to Resume,
- the only real difference is that you don't take off but taxi on the ground in the right direction and speed.
In-Air Resume#
You can prepare for and performe flight resume of an airborne flight while your simulator plane is in the air.
- It is recommended that you pause the simulator for setup (X-Plane: [P], MSFS: [Esc]).
- The FSC client greets you with "You have an active flight". Click the
Prepare for Flight Continuationbutton, which will set fuel and payload automatically if configured, the same way as during boarding, but will not move you anywhere yet. If you configured FSC not to set fuel/payload automatically, then you have to do so manually now. - Next, click the
Teleport or Fly to Resume Pointbutton. - An artifical instrument appears, the Resume Path Indicator (RPI).
- Size the Job window so that the entire RPI including the text underneath is shown. Or pop it out into a separate screen by clicking the Windows button (left of the Teleport option).
- Above the RPI, ensure Teleport is selected.
- Under the RPI, ensure the Auto Teleport option is activated.
- Now unpause the simulator to continue your flight.
- Fly your plane to correct speed and heading:
- Turn to the correct heading, so that the target heading appears on top of the RPI and the top rectange turns green.
- Accelerate to the target speed so that the triangle on the left speed bar of the RPI turns green.
- When both heading and speed matches, keep you plane straight and levelled.
- The text unter the RPI gives hints which aspects need correction.
- As soon as all conditions are met the FSC client teleports your plane to the Resume Point, ie. right location and altitude. You flight resumes momentarily.
Inflight Start (X-Plane only)#
In X-Plane, instead of Teleport or Fly to Resume Point you also have the option to click Inflight Start. This is similar to choosing a "10nm out approach" in X-Plane's flight setup: You will be thrown into the air in your aircraft with engines on, exactly at the Resume Point, heading in the right direction. This is the fastest way to resume, but many complex aircraft models don't handle in-air starts well.
Try a "10nm out approach" with your aircraft models to find it out.
Flying Manually#
Manually flying means that the plugin gives you guidance to the Resume Point, but you take off at your own discretion and fly your plane there manually or by autopilot. This will work with any aircraft but takes the most time and effort. To help with this, the FSCharter client
- offers an artificial instrument, the Resume Path Indicator (RPI), that guides you to the Resume Point,
- the exact coordinates of the Resume Point to be entered into your FMS, and
- an option to write a flight plan, which includes the Resume Point as well as a prior point to make sure to get there having the right heading.
The following sections provide more details when you need to fly manually (ie. not using Inflight Start or Teleport):
Autopilot — Add Resume Point as waypoint to your FMS#
The job window offers details about the position of the Resume Point. Click on the line (with the triangle) to see all details: latitude, longitude with high prevision, altitude, expected heading when passing the point.
Another waypoint before the actual Resume Point is also offered. Adding both to your flight plan ensures that you reach the Resume Point flying the correct heading.
You can use the position and altitude information to add GPS waypoints to your aircraft's FMS so you can use the autopilot to get there.
X-Plane only: There are two buttons to add the waypoint(s) directly to the flightplan in X-Plane's standard FMS (e.g. used by the aircraft shipped with X-Plane).
Write a Flight Plan File#
Clicking the Write .fms/.pln file button writes a flightplan into Output/FMS plans/FSC_Resume.fms (X-Plane) or <User>/Downloads/FSC_Resume.pln (SimConnect). The plan starts at the current airport, includes both waypoints and ends at the job's destination airport. You can use this plan to have your autopilot fly you to the Resume Point.
- In X-Plane, you can load this flightplan into the FMS. After the Resume Point, insert all the remaining waypoints to your destination as usual and start flying the plan. You can find X-Plane Navigation & autopilot manuals here.
- In both MSFS and P3D, determining the current airport proved surprisingly difficult...the client will do its best guess and write that into the flight plan file. It might not be where you actually are.
- In MSFS go back to the
Home Screen > World Map > [LOAD/SAVE] > [LOAD] > <User>\Downloads\FSC_Resume.pln > [Open] > [FLY]. The flight plan's cruising altitude is set to the Resume Point's altitude as MSFS does currently not honor altitude settings of individual waypoints. If you change the cruising altitude setting then still make sure the right altitude before arriving at the Resume Point. - In P3D, load the aircraft at the airport at which you want to continue, then open the Flight Planner, navigate to your user's
Downloadsfolder, selectFSC_Resume.pln, and click Load.
When nearing the Resume Point make sure to have an acceptable speed and altitude. The RPI will tell you.
The Resume Path Indicator (RPI)#
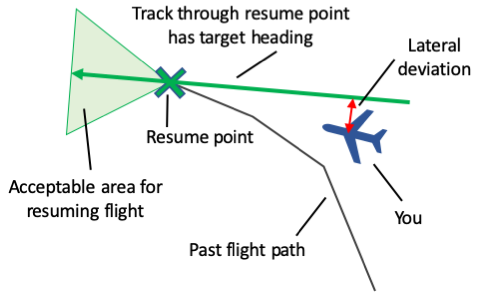
To resume a flight you have to fly to the Resume Point with about the same heading as originally, and certainly at about the same altitude. There is plenty of tolerance, see the green acceptable area in the following diagram:
When you select Teleport or Fly to Resume Point the Job window changes to a flight instrument similar to the ILS mode of a Navigation Display of modern aircraft.
Click on the window icon in the top left corner to separate the RPI into a smaller window on black background, which is easier to read. Also this smaller window can be moved around and changed in size.
The radio buttons at the top switch between Teleport and Manual Flying modes.
Teleport Mode#
In Teleport mode, only the two parameters relevant before teleporting are shown (speed and heading) and the Teleport button will appear when both match acceptable values. If the Auto Teleport option is enabled, then you will be teleported automatically as soon as all conditions are met...be prepared!
Tip (X-Plane only): You can assign a joystick button or keyboard shortcut to the Teleport button (in X-Plane's Joystick/Keyboard settings) so that you don't need to take your hands off the controls. Same goes for toggling the separate RPI window.
Manual Flying Mode#
The RPI not only guides you to the Resume Point's position, but also allows you to align with track and heading: The flight will only resume if you reach the Resume Point and at the same time fly at the right speed and in the right direction. There is some room for tolerance to each parameter, expressed in "acceptable ranges".
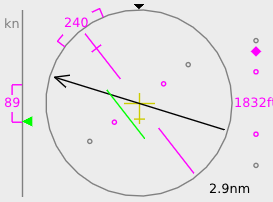
The RPI includes - left to right:
- The speed bar that shows the acceptable speed range in the center and your current speed as triangle. Speeds are KIAS.
- The circular HSI in ILS mode shows:
- Relative Bearing to the Resume Point as a white|black/green arrow.
- Track heading as magenta/green line with a crossbar in the direction of flight and with the middle section moving to the sides, indicating your lateral distance to the track path. Each small circle represents a lateral distance of 3nm. Less thn 3nm, ie. inside the inner magenta circles is acceptable.
- The acceptable heading range is indicated on the outside of the instrument's circle.
- Distance to the Resume Point is stated in the bottom right corner.
- The altitude bar shows the expected altitude and the acceptable range in magenta in the center. The diamond tells you if the Resume Point is above/below you (like in a glidepath indicator for an ILS approach). Each small circle represents 500ft altitude difference, the acceptable range is within the inner magenta circles, ie. +/- 500ft.
The text under the instrument shows what needs to be done next for successful flight continuation.
Generally, the colors have the following meaning:
Green: Flight parameter is in the acceptable range now.
Magenta: Target value / range
White|Black: Current Value not yet in an acceptable range
Practical Tips for Manual Flying#
Manual flying to and aligning with the Resume Point is pretty much like an ILS approach to a runway with 3 main differences: There is no glidescope, but a fixed altitude; you can't see the runway; the autopilot cannot follow the path automatically (but you can still use the autopilot to control altitude, speed, and heading, and you could have inserted waypoints via the FMS).
To align with the track before reaching the Resume Point:
- Ideally, pick a nearby airport "before" the Resume Point, so that when you start flying towards the Resume Point you are already roughly heading in the right direction for your destination (otherwise you would need to fly past the Resume Point and make a U turn).
- Start flying in the direction of the Relative Bearing arrow, ie. directly towards the Resume Point.
- Climb to the required altitude.
- A few miles out (3nm with smaller aircraft, maybe as much as 10nm with larger fast aircraft) start aligning with the track:
- Turn into the direction in which the Lateral Distance indicator (the middle segment of the Track Heading) is displaced, well beyond current Relative Bearing. This will over time reduce your lateral distance.
- Start turning back towards the required Track Heading when the Lateral Distance indicator aligns with the track line, at which time the Relative Bearing arrow will fall in line, too. You are perfectly aligned when both the Relative Bearing arrow and the Track Heading are in one line.
- Watch your speed.
- Now fly straight and level across the Resume Point. Avoid sharp last minute fixes...there is plenty of tolerance, just keep going. A message will show up telling you once the flight is being continued.